If you are a publisher, you may be losing money because your visitors are using ad blockers on their web browsers. In this post, we will see, How to setup Google Adsense Ad Block Recovery to display message to allow ads.
Ads can be annoying. I get it. But as content creators, we rely on advertising to fund our website. The time and effort we put in to create free content is compensated by whatever amount we earn from the advertising. Plus, we also spend money to pay for domain name and hosting to run our websites. So, in that sense, advertising is not bad. Advertising is what allows publishers to keep creating content for free. But you could be losing out on the revenues because users may have installed ad blockers on their web browsers. So no ads are getting displayed to them.
Many publishers use Google Adsense which is the most common advertising platform for publishers today. If you want to display a message to your visitors using Ad Block, you can use Google Adsense Ad Block Recovery Message.
Table of Contents
What is Google Adsense Ad Block Recovery Message
Google has introduced a new feature called “Ad Block Recovery Message” within Google Adsense to help publishers recover revenue loss from ad blocking. This is clearly explained in the article from Google Blog -“Helping publishers recover lost revenue from ad blocking“.
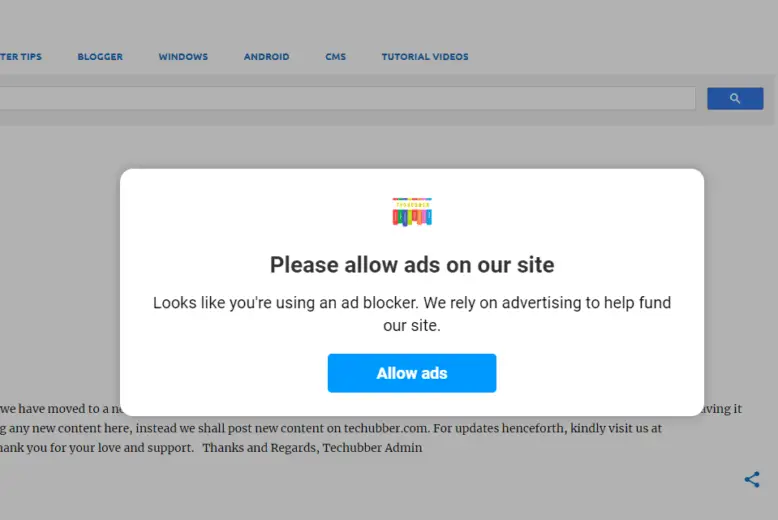
Publishers can now setup the “Ad Block Recovery Message” in Google Adsense and display a message to visitors using Ad Blocker to allow ads.
How Google Adsense Ad Block Recovery works
- The message is only displayed to visitors using ad block extensions on their web browsers.
- AdBlock and Adblock Plus are browser extensions that site visitors use to block ads when they visit websites.
- In some cases, AdBlock and Adblock Plus users may choose to allow ads on specific sites by adding those sites to the allowlist in their browser extension.
- To simplify the allow listing process for site visitors, the allow listing functionality is added to the “Allow ads” button that already appears in the Google Adsense Ad Block Recovery message.
- When visitors click the “Allow ads” button in the Google Adsense Ad Block Recovery Message, your site is added to the allowlist in their browser extension and they will continue to see ads on your site.
How to setup Google Adsense Ad Block Recovery to display message to allow ads
To set up Ad Blocking Recovery, you must already have:-
- Google AdSense account approved to show ads
- Sites added to Google Adsense
- You should have access to your website backend to insert some code
Watch this video demo regarding How to setup Google Adsense Ad Block Recovery to display message to allow ads.
Steps to setup Google Adsense Ad Block Recovery to display message to allow ads
- Login to your AdSense account.
- Click Privacy & messaging from the left side menu
- Click Ad blocking recovery.
- Click Create message

- Click “Add site” in the Add your sites section
When you clock “Add Site”, all the website which are approved under your Google Adsense account will be displayed. You can select the sites where you want the messages to appear.
You need to name the site and add a logo for the website. This is displayed in the ad block recovery message displayed to the visitors. - Select default languages > You need to select at least one language.
The message is shown in the default language when the user’s device language cannot be determined. - Click Continue – You will not be taken to a new page where you can see the preview of the Google Adsense Ad Block Recovery Message.

- Provide a meaning full name at the top left corner which will help you to identify it.
- Edit the message:
- Hover your mouse over the message text and click on the pencil icon to edit the text displayed.
- Page inclusions and exclusions: add URLs on your website which you want to exclude.
- Adjust the placement of the message:
- Decide how and where you’d like the message to be displayed on your site:
- Centered modal (dismiss-able): The message is centered on your page. Users can close the message.
- Centered modal (non-dismissible): The message is centered on your page. Users cannot close the message. Users cannot view the page content unless allowed.
- Bottom pinned (dismiss-able): The message is fixed to the bottom of the page to allow site visitors to view the page’s content. The message stretches to fit the full width of the device screen. Users can close the message.
- Styling:
- Click on the styling and customize the look and feel of the message.
- Publish:
- Once you are done, click on Publish
Ad Block Recovery > TAGGING tab:
After creating the message, you need to copy the tagging code from the tagging tab and add it to your website in order to display the ad blocking recovery message. You need to add the code between the <head> and </head> tags of your website.
- After creating the message, click on the TAGGING tab.
- Copy the first code displayed
- Insert the code between the <head> and </head> tags of your website.
- That’s all.
If you are using WordPress website, login to your WordPress website as admin and navigate to appearance > theme file editor > select your child theme > select header.php > paste the code just above </head> > save the file.
OR
If you do not have header.php visible, you can also install a plugin for adding custom code in header or footer. Such as WPCode – Insert Headers and Footers + Custom Code Snippets – WordPress Code Manager
If you are using Google’s Blogspot Site, you can login to Blogger and go to THEME > CUSTOMIZE > EDIT HTML > and paste the code just above </head> > save.
Testing Google Adsense Ad Block Recovery
To test whether Google Adsense Ad Block Recovery is working or not, open a Google Chrome browser, and install AdBlock extension.
- Open Google Chrome
- Click on the MENU > Settings > Extensions
- Search for AdBlock and add it to Chrome
- Now open your website for which you just enabled the Google Adsense Ad Block Recovery
- The popup message should appear.
- Click Allow Ads and see if ads appear on your website.
- Test it out and customize as per your requirement
# How to allow ads on website installed with adblocker
# How to show ads on website #How to add site to allowlist in adblocker
# Google Adsense Ad Block Recovery

Leave a Comment (FB)