Installing WordPress on your local machine using XAMPP is a convenient way to develop and test your website before making it live. XAMPP is a free and open source cross-platform web server solution stack package developed by Apache Friends. It is one of the easiest way to run Content management system (CMS) such as WordPress, Joomla, Drupal and many other CMS on Windows. In this post, we will see How to install WordPress using XAMPP on Windows?
WordPress is a popular website platform and is the most popular CMS in use today. Whether you want to install WordPress for website development purpose or any other CMS, XAMPP is a very handy tool to have.
To install WordPress on Windows PC using XAMPP, you need the following:
First, install XAMPP on Windows PC!
Download XAMPP.
Once downloaded, run the installer and follow the on-screen instructions to complete the installation.
Follow the steps in the first part of this video to install XAMPP on Windows. Or you can also refer to this previous – How to install XAMPP on Windows computer? After you are done installing XAMPP on Windows, move to the next section below.
XAMPP is installed by default at “C:/XAMPP” and the website files are hosted under “C:\xampp\htdocs\” directory.
Table of Contents
Note: IIS and XAMPP on the same computer?
If you have Internet Information Services (IIS) installed on the same computer, then XAMPP Apache will not be accessible by using “http://localhost” due to HTTP port 80 conflict. In this case, see the steps mentioned in our previous post to fix the issues –How to install and run XAMPP together with IIS and MySQL Server already installed on same computer.
Next, install WordPress using XAMPP on Windows PC
STEPS TO INSTALL WORDPRESS ON WINDOWS PC USING XAMPP
1) Start Apache and MySQL services from XAMPP Control Panel
After you have XAMPP installed, open XAMPP control panel and start Apache and MySql services.
Click on “Start” button next to Apache and MySQL from the XAMPP Control Panel.
These services need to be running for WordPress to work.

2) Create a database for WordPress using phpMyAdmin
- Open your web browser and enter “localhost/phpmyadmin” in the address bar.
This will open phpMyAdmin, a web-based tool for managing databases.Note: If you are running IIS and XAMPP both on the same machine, you might have configured XAMPP to access Apache with a different port number such as 8080, instead of the default port 80.
In that case, you might need to access localhost with the URL http://localhost:8080/phpmyadmin - Click on the “Databases” tab and enter a name for your WordPress database.
- Click “Create” to create the database.
3) Prepare for WordPress installation
Download WordPress: Visit the official WordPress website and download the latest version of WordPress.
Extract the downloaded zip file to the “htdocs” folder in your XAMPP installation directory.
- Now open Windows Explorer and navigate to “c:/xampp/htdocs” (or wherever you had installed XAMPP)
- Create a new folder say “mywpsite” under the “c:/xampp/htdocs” directory.
- Copy WordPress setup ZIP file downloaded to “c:/xampp/htdocs” directory.
- Extract the WordPress setup file downloaded.
- Go inside the extracted folder and copy all the contents and paste to the location “c:/xampp/htdocs/mywpsite“.
- Rename the file wp-config-sample.php in the “c:/xampp/htdocs/wordpress.” to “wp-config.php”.
- Open “wp-config.php” in a notepad or any text editor.
- Now, in the file, search and edit the following lines as required.
/** The name of the database for WordPress */
define(‘DB_NAME’, ‘wordpress’);
//Replace with the name of the database you created from phpmyadmin earlier. I have entered “wordpress”./** MySQL database username */
define(‘DB_USER’, ‘database-username);
//Replace with database username. Default = root. If you created a separate DB user for the database “wordpress”, enter that here.
/** MySQL database password */
define(‘DB_PASSWORD’, ‘database-user-password’);
//Replace ‘database-user-password’ with database password. If you created a separate DB user for the database “wordpress”, enter the password for the DB user.

4) Install WordPress
- Open up a browser and go to “http://localhost/mywpsite/’” or using “http://localhost:8080/mywpsite – if you had changed the Apache httpd.conf localhost port number.
- This will start the WordPress installation process.
- Select your preferred language and click “Continue“.
- Enter the database name, username, and password you created earlier.
- Click “Submit” and then “Run the Install“.
- Follow the on-screen instructions to complete the installation.
- Once the installation is complete, you can log in to your WordPress dashboard by entering “http://localhost/mywpsite/wp-admin” in your web browser’s address bar.
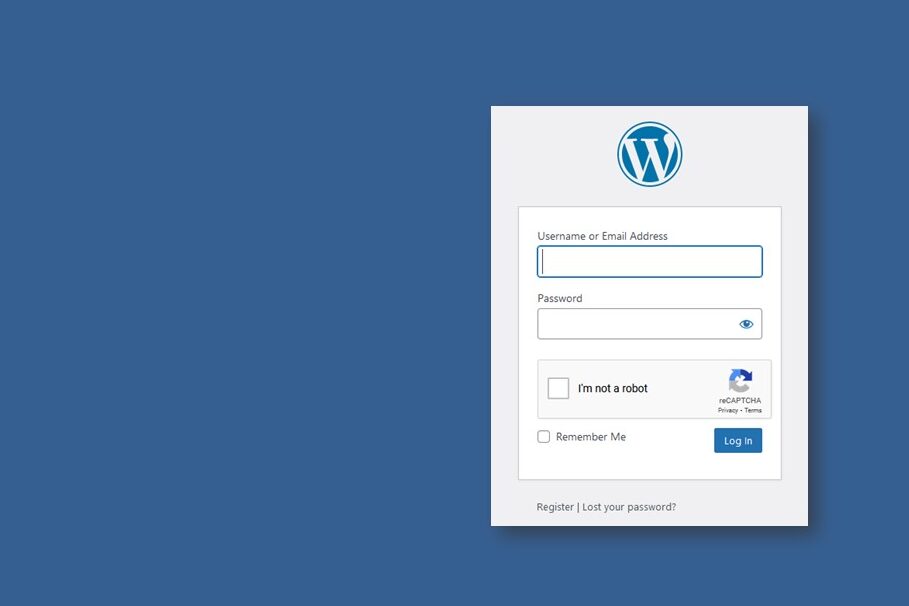
Use the username and password you set during the installation process.
Once logged in, you will be at WordPress Admin Dashboard. - Install new themes, plugins and configure your new WordPress site.
# How to install WordPress on XAMPP in Windows

Leave a Comment (FB)