Irrespective of which web browser you use, if you are signed in to Google, and you access Google.com, you might have noticed your previous Google searches appearing in the Google Search Bar. In this post, we will discuss how to delete Google Search history from the Google Search Bar.
Note: Here, we are not talking about clearing the browser history, which is browser specific. Here, we are discussing about the Google Search History – the keyword and sentences you types when using Google Search, and how to clear those.
Table of Contents
Why you might want to delete Google Search History?
As you might already be aware, Google keeps a record of all the search terms or queries you enter in Google search engine while signed into their Google account. Google Search Activity is a comprehensive record of the queries you have entered into the Google, along with the results and actions you took as a result of those queries. This activity is automatically logged by Google whenever a user conducts a search. The data maintained on your searches are in turn used to personalize your experience.
You might want to delete Google Search History for the following reasons:
- Security: Sensitive searches may expose personal information; clearing history adds a layer of security.
- Privacy: Prevent others who use your device from seeing your search history.
- Personalized Ads: Google uses search history to personalize ads; clearing it can reduce ad targeting.
- Decluttering: Removing irrelevant or outdated searches can make your browsing experience more efficient.
Additionally, deleting Google Search History would also eliminate unwanted search suggestions that arise from past queries, ensuring a more streamlined and relevant search experience in the future.
Here, we are not discussing about ‘How to delete Google Chrome Browsing History?’, but if that is what you are looking for, follow the link to read about the steps to delete Google Chrome Browsing History.
First, Check your Google Search History
As discussed, Google saves your Search history in your Google Account. To find out your Google Search history, do the following:
- Open your favorite web browser which you normally sign in to use Google.com, Gmail, Google Drive etc.
- Open Google.com. If you are not signed in to Google, sign in.
- Now open Google.com and click on the search bar.
- Your recent search queries are visible below the search bar as suggestions.
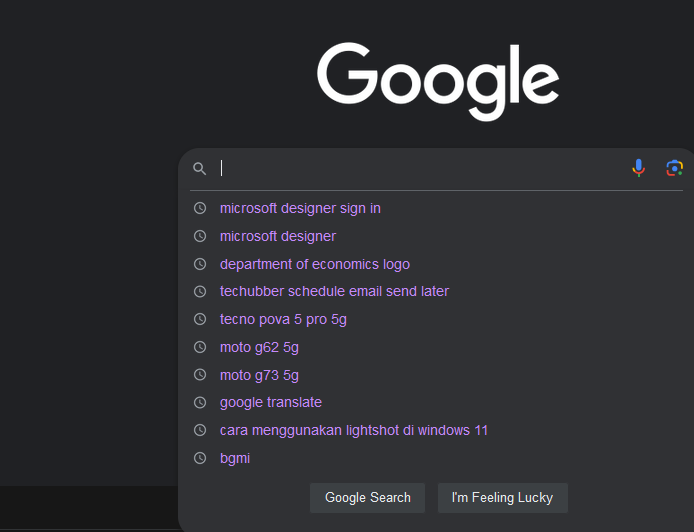
Usually the search queries are synced across devices where you are signed in to Google account unless you have specifically disabled sync. So your Google searches done on mobile will also appear on desktop and vice-versa.
How to delete Google Search History
There are various ways you can delete your Google Search History as explained below. You can delete one at a time, delete today, delete custom range, delete all and also setup auto delete.
Option 1 : Delete Google Search History one by one (works on mobile and desktop browser)
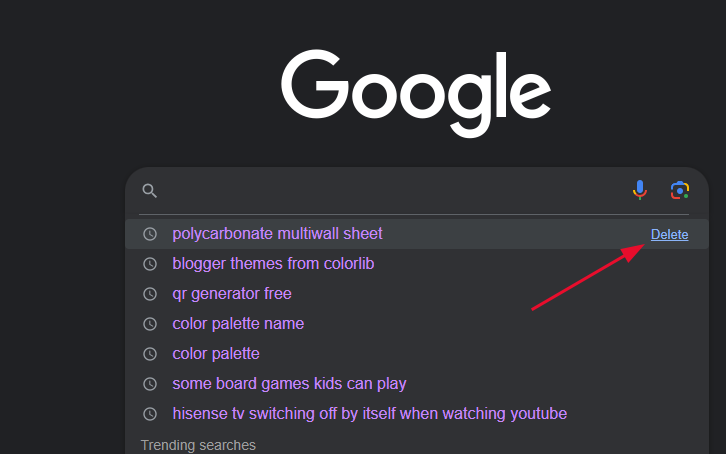
While you are signed in to Google account, open Google.com in a web browser and click on the search bar. Your previous search queries are visible as suggestions.
- On desktop browser, hover your mouse on the search queries and you will see DELETE link on the right. Click on it to delete that previous search suggestion.
- On mobile, you need to long press on the specific search query, you will get a prompt to remove the suggestion from history. Tap on OK to remove.
Option 2 : Delete Google Search History today / custom range / delete all
- While you are signed in to Google account, open Google.com in a web browser and click on the search bar. Your previous search queries are visible as suggestions.
- To delete Google Search History for today, custom range or delete all, click on your Google Account profile icon on the top right, and then click on ‘Manage your Google Account‘
- In the welcome screen, you will find a search box with ‘Search Google Account‘ placeholder text in it. Here, type ‘Search History‘ in the search box.
- Click on ‘Search Settings‘ (Data & Privacy)
- In the next page (Activity), click on ‘Search History‘.

- In the Search History page, you will see that Auto-delete is enabled and set for 3 months by default.
- To delete your Google Search History now, click on ‘DELETE’ button.
You will get the following options – today, custom range or delete all.
You can select depending on your choice.

- Let’s assume, we choose to delete all, then we will see the following pop-up page “where it says “Choose activity to delete“. Here, you get four options to delete: Discover, Image Search, Search, and Video Search.
You can either keep all if you want to or select Search – that is what we intend to show in this post. After that, you will be asked to confirm the deletion. - Finally, you will see and acknowledgement that the history is deleted.
Option 3: Setup Google Search History auto delete
Google Search History auto-deletes your search history in ‘Web and App activity’ which are older than 3 months by default. If you want you can (1) Turn off auto delete or (2) increase the duration. or (3) Turn it off.
To change Turn off auto delete or increase the duration, follow the steps below:
- While you are signed in to Google account, open Google.com. If not signed in, please sign in.
- Click on your Google Account profile icon on the top right, and then click on ‘Manage your Google Account‘
- In the welcome screen, you will find a search box with ‘Search Google Account‘ placeholder text in it. Here, type ‘Search History‘ in the search box.
- Click on ‘Search Settings‘ (Data & Privacy)
- You should now be able to see “Search history = Saving” , means, you are saving the search history.
- Click on Search history
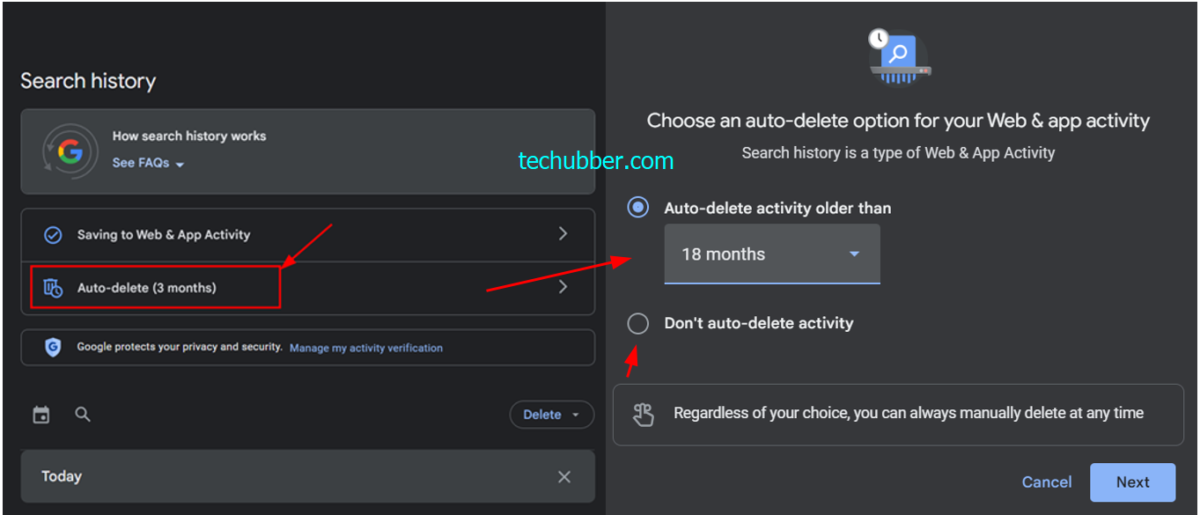
- Here you will see ‘Auto-delete (3 months)‘. Click on it.
- Now, you can increase the duration from 3 months to 18 or 36 months or you can also select ‘Don’t auto-delete activity‘.
How to turn off Google ‘Web and App activity’
Web & App Activity saves your activity on Google sites and apps, including associated information like location, to give you faster searches, better recommendations and more personalised experiences in Maps, Search and other Google services. If you are not too skeptical about Google then it is better kept on. However, if you would like to turn it off, then you can do so from the steps below.
- While you are signed in to Google account, open Google.com. If not signed in, please sign in.
- Click on your Google Account profile icon on the top right, and then click on ‘Manage your Google Account‘
- In the welcome screen, you will find a search box with ‘Search Google Account‘ placeholder text in it. Here, type ‘Search History‘ in the search box.
- Click on ‘Search Settings‘ (Data & Privacy)
- You should now be able to see “Search history = Saving” , means, you are saving the search history. Click on Search history.
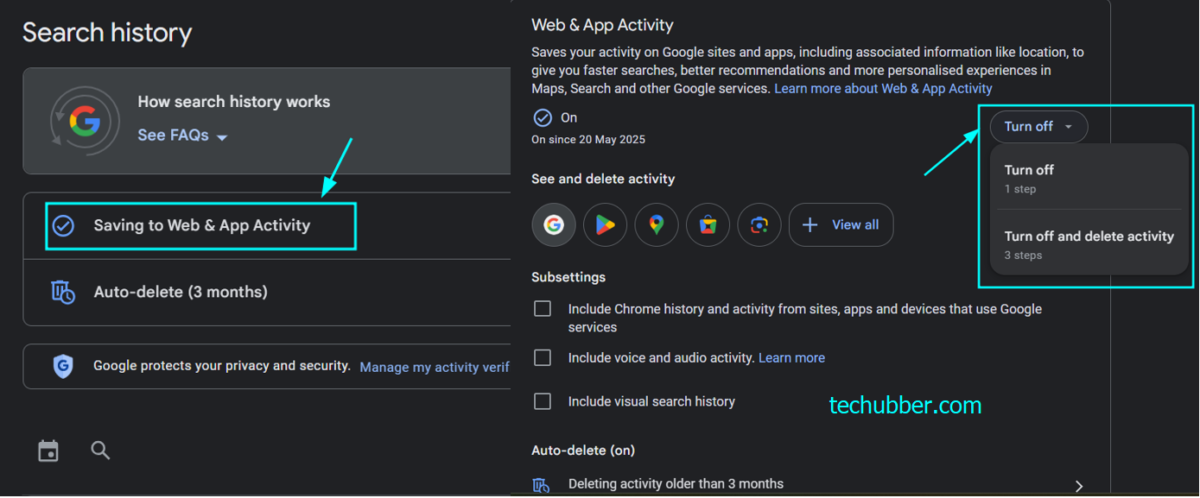
- In the next page, look for ‘Saving to Web & App Activity‘.
- Under ‘Web & App Activity‘, click on the ‘Turn off‘ button. You have options to turn off or turn off and delete activity. You may choose either one.
- In the next page, you need to confirm. Click on ‘Got it’.
When you turn off ‘Web & App Activity’, new activity won’t be saved to your account, and this applies to various Google services such as search, maps, chrome, assistant, play etc.
If at a later stage, you want to turn back on, you can come to the same page as indicated above, and turn back on.
So, in this post we discussed how to delete Google Search History one by one or delete Google Search History today / custom range / delete all and how to setup Google Search auto delete. All these are a part of Google’s ‘Web and App activity’. By following the above steps, you can control your Google Web and App activity, including your Google Search.
#How to clear Google Search History
#How to delete Google Search History
Leave a Comment (FB)