If you are trying to install or re-install Windows 11 on your computer, and no hard disk is detected during Windows 11 installation, then you have come to the right place. In this post, we are discussing “hard disk not detected during Windows 11 installation”, and you will probably find the solution to fix the issue.
Alright. Before we begin, let’s assume:
- You have a 64 Bit computer on which you are trying to install Windows 11 OS.
- You have already created the Windows 11 installation media – bootable USB pendrive or DVD.
If you do not know, click the link to follow step by step instruction to create a bootable USB pendrive for Windows 11 installation. - Make sure your hard disk is detected in the BIOS.
Table of Contents
Hard disk not detected during Windows 11 installation?
How to check for hard disk in the BIOS?Power On or Restart the Computer and press the designated key on your keyboard to open the BIOS / UEFI menu. The key depends on the Make and Model of your computer. But the most common BIOS keys are – Esc, Del, F2, F10, and F12. So you can try any of these or google it for your PC.
Once you are in BIOS, navigate to “Configuration” / “Boot” / “Advanced Section” and look for a section that is related to storage devices or integrated peripherals. On HP desktop with BIOS version F.21 – configuration > UEFI HII Configuration > Intel Rapid Storage Technology > under SATA and PCIe > we can find the hard disks. If it’s a SATA hard disk it will be visible under SATA, otherwise, under PCIe.
If the hard disk is not detected, there may be an issue with the connection or the hard disk itself. You may even check whether the hard disk is working properly or not. For this you might want to plug in the hard disk to some hard disk dock if you have one, or connect the hard disk to some other computer.
You can install Windows 11 OS using the bootable USB created using the official Media Creation Tool or via a third-party app like Rufus. But during the process of Windows 11 installation, we come to a point where we need to select the hard disk on which we want to install Windows 11 OS. But if the hard disk is not detected, we cannot proceed. When this happens, you might be seeing the following alert message on screen-
“We couldn’t find any drives. To get a storage driver, click Load driver.”

When you click the “Load Driver”, another message appears like “No device drivers were found. Make sure that the installation media contains the correct drivers, and then click OK”.

Cause of the issue:
The primary cause of the issue is that Windows 11 installation is unable to detect the drive due to missing drivers in the installation media. This issue is pretty common if the drive is PCIe NVMe type SSD.
The main cause of this issue due to missing driver in the Windows 11 installation media created using the Media Creation Tool or Rufus.
So, we need to download and include the necessary Intel Rapid Storage Technology (IRST) drivers in the bootable USB for Windows 11.
Solution for no hard disk is detected during Windows 11 installation
1) Create the Windows 11 bootable USB using the media creation tool or Rufus as usual.
You may refer to the link to see step by step process to create bootable USB for Windows 11.
2)Download Intel Rapid Storage Technology (IRST) drivers and put the drivers in the bootable USB, so that we can install drivers during the Windows 11 installation by click on Load Driver when the disk is not detected.
You can download the necessary IRST drivers from Intel website.
You can also find IRST drivers from manufacturer website but those will be most exe files, so it is useless during Windows 11 installation, as exe files will not run.
2.1) Download RST_F6Floppy – required if your PC have PCIe drives.
- Download “RST_F6Floppy.zip” from Intel website.
- The Intel “RST_F6Floppy.zip” driver is required during operating system (OS) installation to detect PCIe* NVMe* drives.
- Extract the ZIP file and copy the extracted folder and paste it in the bootable USB you created.
2.2)Download IRST SetupRST.exe
Now, this is an exe file. So we cannot run this as it is during Windows 11 installation. So we need to extract the files from the exe and use it during the installation from “Load Driver”. Steps to extract files from SetupRST.exe is as given here – Unable to Find the Intel® Rapid Storage Technology (Intel® RST) Driver in Zip Format.
- Download IRST SetupRST.exe
- Open Windows PowerShell > navigate to the Downloads folder
- Copy and paste the following command: ./SetupRST.exe -extractdrivers SetupRST_extracted

- You will get a prompt from Intel® Rapid Storage Technology , click YES.
- The files will be extracted to the folder “SetupRST_extracted” in the downloads folder.
- Copy this folder (SetupRST_extracted) and paste it in the bootable USB.
So, in the bootable USB for Windows 11, we have two additional folders for IRST drivers:
- RST-F6Floppy-19.5.1.1040
- SetupRST_extracted
Now that we have the necessary IRST Drivers in the bootable USB for Windows 11, we can start with the Windows 11 installation.
3) Insert the bootable USB with the loaded drivers and install Windows 11
Insert the Windows installation USB flash drive into the computer and start the installation. Follow the instructions on screen and select your options.
At the Which type of installation do you want? window, select one of the following options:
Upgrade: Install Windows and keep files, settings, and applications: Keeps all your personal files, settings, and apps.
Custom: Install Windows only (advanced): Keeps nothing and erases all data.
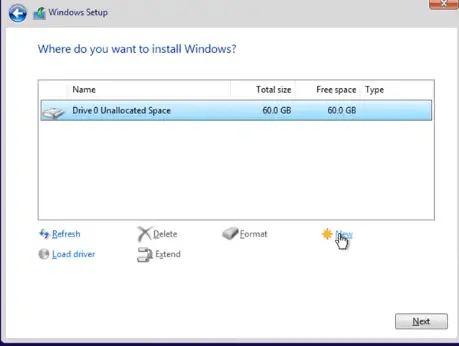
At the “Where do you want to install Windows” screen, the disk is not detected.
Click Load Driver.

Click Browse to navigate to the location of the IRST driver.
- First, browse and select the RST-F6Floppy folder and click OK.
- Compatible drivers will be displayed on screen
- Select the drivers displayed in the list, and then click Next to install the drivers.
- Next, browse and select the SetupRST_extracted folder > next VMD folder and click OK.
During the OS installation process, click Load Driver. The VMD driver will need to be installed to detect the drives being managed by Intel® RST under the Intel® VMD Controller.- Compatible drivers will be displayed on screen
- Select the drivers displayed in the list, and then click Next to install the drivers.

After the drivers are loaded, the hard disk will be displayed.

Click Format to format the drive or you can simply click Next to start the Windows 11 installation.
Continue through the installation procedure until the installation is complete.
After the installation is complete, Windows will reboot.
It is better to remove the bootable USB at this stage, so that the PC does not boot from the USB and start the Windows 11 installation again.
From here, the Windows 11 installation is as usual. You can refer this article > How to install Windows 11 from bootable USB using Microsoft media creation tool.
# no hard disk detected during windows 11 installation
# Load driver during Windows 11 installation
# Disk drivers missing during Windows installation
# install IRST drivers windows


Leave a Comment (FB)