Are you looking to install / re-install Windows 11 on your computer? And are you wondering how to create bootable USB for installing Windows 11? In this post we are discussing just that – How to install Windows 11 from bootable USB?
There are three ways specified by Microsoft for installing Windows 11:
- Using Windows 11 Installation Assistant
– This option can be used to upgrade a Windows 10 PC to Windows 11, if you have Windows 10 licence and if your computer meets the required specifications for running Windows 11. - By creating creating Windows 11 Installation Media using Microsoft media creation tool
– This option is suitable if you want to perform a re-install or clean install of Windows 11 on a new or used PC.
– Using this option, you can create a bootable USB directly using the Microsoft media creation tool. - Download Windows 11 Disk Image (ISO) for x64 device
– This option will allow you to download Windows 11 ISO file. This is suitable for users who want to create a bootable installation media (USB flash drive, DVD) using third party tools (such as Rufus) or for those who want to create a virtual machine (.ISO file) to install Windows 11.
– This download is a multi-edition ISO which uses your product key to unlock the correct edition.
In this post, we shall discuss the second option – How to install Windows 11 from bootable USB by creating creating Windows 11 Installation Media using Microsoft media creation tool.
How to install Windows 11 from bootable USB using Microsoft media creation tool?
If you want to install Windows 11 using a bootable USB media then there are two ways of doing it:
1) Create bootable USB for installing Windows 11 directly using Microsoft media creation tool.
2) Create bootable USB for installing Windows 11 using Rufus – after downloading Windows 11 ISO using using Microsoft media creation tool.
In this post, we shall discuss the first one – that is, how to create bootable USB for installing Windows 11 using Microsoft media creation tool.
This post covers the following sub-topics:
1) How to download Microsoft Media Creation Tool for Windows 11?
2) How to create bootable USB for Windows 11 using Microsoft Media Creation tool?
3) How to install Windows 11 from bootable USB?
Let’s begin!
Why and when you need a bootable USB to install Windows 11?
If you have a Windows 11 installation media in the form of a DVD, and your computer is equipped with a DVD drive, then you can use the DVD. No need to make a bootable USB.
You can use the bootable USB for Windows 11 for:
- You have a Windows 11 disc, but your computer does not have a DVD drive, which is pretty common nowadays. Then you can create a bootable USB to install Windows 11.
- You can use the bootable USB to upgrade Windows 10 to 11, provided your computer is support for the upgrade.
- You can use the bootable USB to reinstall Windows 11 in case your computer running on Windows 11 faces some issues and you need to reinstall Windows 11.
- You can also use it to install Windows 11 on a new PC provided you have a separate licence or product key purchased for that.
Before you proceed, please note:
1) You should have a license key to install Windows 11 or have a Windows 10 device that qualifies for an upgrade to Windows 11.
2) Windows 11 can only run on 64-bit CPU.
3) If you are going to install Windows 11 on another PC, you can download the Microsoft Media Creation Tool from any other Windows PC and create the bootable USB. You need a USB pendrive with space more than 8 GB
Step 1: How to download Microsoft Media Creation Tool for Windows 11
You can create a bootable USB for installing Windows 11 directly using the Microsoft media creation tool. Microsoft’s Media Creation Tool allows you to create installation media using a DVD or a USB flash drive. If you already own a copy of Windows 11, you can use this tool to reinstall it or you can also create a bootable USB for installing Windows 11 for another PC.
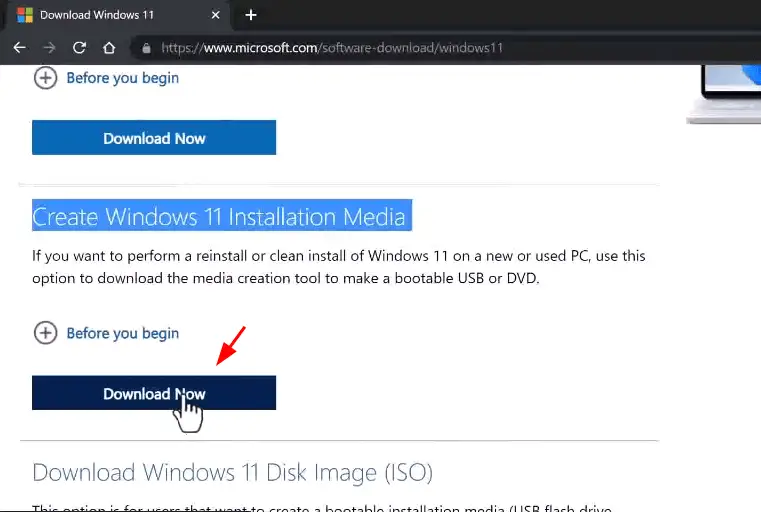
- Go to this link: https://www.microsoft.com/software-download/windows11
- Under “Create Windows 11 Installation Media“, click on the download button to download the Microsoft media creation tool.
- Or you can directly download from this link: https://go.microsoft.com/fwlink/?linkid=2156295
- The media creation tool will be downloaded to your computer and should be available in the downloads folder.
Step 2: Create the bootable USB for Windows 11 using Microsoft Media Creation tool
Now that we have downloaded the Microsoft Media creation tool, we will use the tool to create a bootable USB for installing Windows 11.
- Locate the Microsoft media creation tool you just downloaded, which should normally be available in the downloads folder.
- Select the media creation tool and run as administrator.
- Accept the licence agreement.
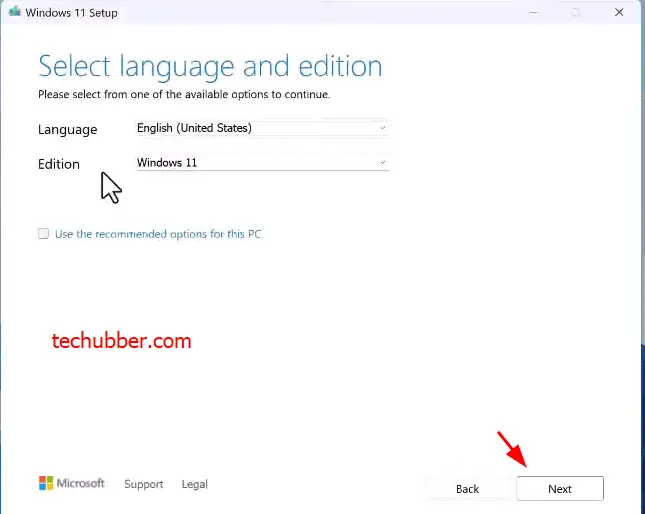
- Select language and edition and click NEXT
- If the PC on which you are running the Media Creation Tool is also Windows 11, then ” Use the recommended options for this PC” is checked.
- If you want to choose another language and edition, uncheck ” Use the recommended options for this PC”, and select language and edition.
- NOTE: Under edition, you will not find 32-bit or 64-bit to choose – This is because Windows 11 is designed to run only on 62 bit processors.
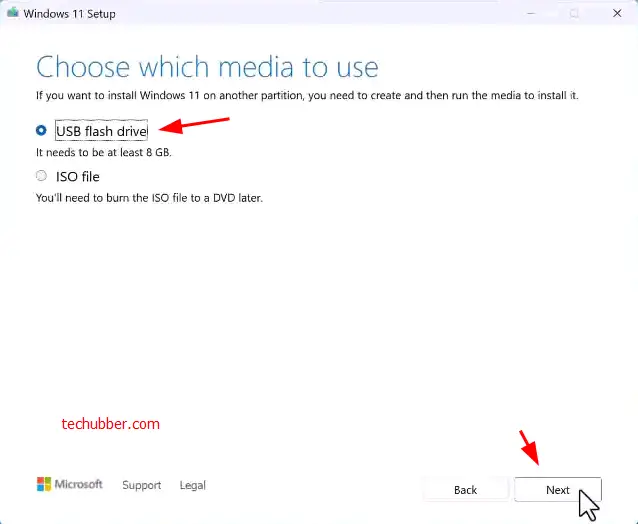
- On the next page, Choose the Media to use – USB Flash Drive or ISO file.
- Here you can opt the “ISO file” option if you want to download Windows 11 setup as ISO file. You can later use the ISO to burn it to DVD or use tools like Rufus to create a bootable USB later.
- Since we are going to directly create a bootable USB from the media creation tool, select USB flash drive.
- Click NEXT
- On the next page, select the USB drive where the Windows setup files will be copied to.
- If you have already inserted the USB drive, then it should be detected here.
- If you have multiple USB drives plugged in then, select the right USB drive.
- If you have not yet inserted the USB drive then you can do so now, and click “Refresh drive list”, and select the right one.
NOTE: The files on the USB drive you selected will be deleted. So make sure that he did a USB drive is blank or you have already backed up the files on the USB drive. - Click NEXT
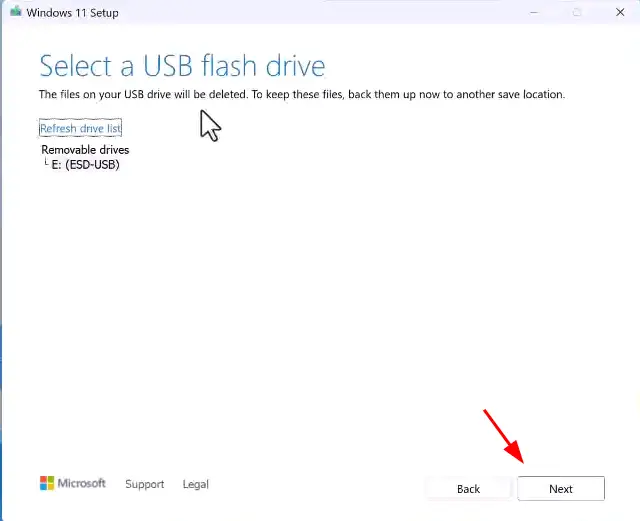
- The media creation tool will now start downloading Windows 11. And the files will be copied to the USB drive.
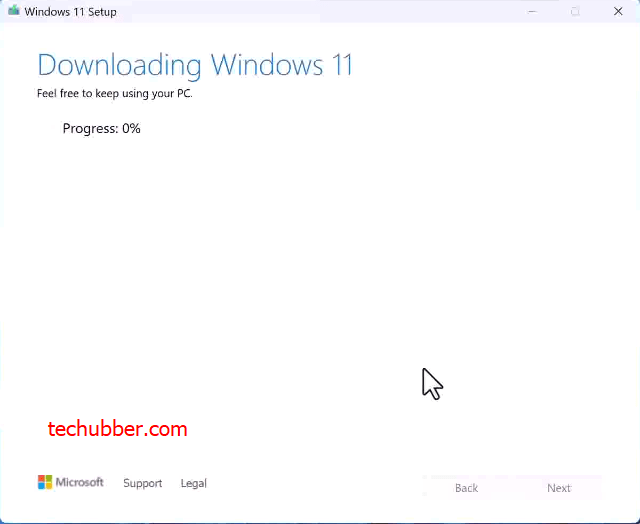
- Wait for the process to complete. Once the process completes, you will see “Your USB drive is ready.”
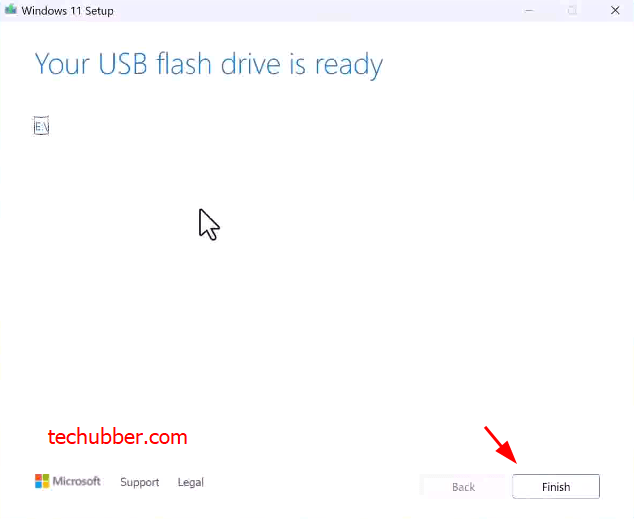
- Click FINISH.
Congratulations! You have successfully created a bootable USB drive for installing Windows 11.
In the next section, we will see how to use the bootable USB drive for installing Windows 11 on a PC.
Step 3: How to install Windows 11 using the bootable USB
Now that you have created a bootable USB for Windows 11, you can use the bootable USB to install Windows 11 on your PC.
3.1. Change Boot Order in BIOS settings.
In order to let the computer boot from the bootable USB, we need to change the boot order in the BIOS settings. We want the computer to detect the bootable USB and start booting from it instead of any existing operating system that might be present on the PC. You can access the BIOS settings using the specific function key such as F10, F12, Delete or ESC key. The BIOS key various, so find the key for your computer’s make and model.
- Power on the computer and quickly press the bios key on your keyboard.
- Once you are in the BIOS settings, look for the boot order. BIOS menu varies. So explore your BIOS. Change the boot order and make sure that USB Drives or Removable devices are at the top.
- Before you save and submit the changes, plug in the bootable USB drive for Windows 11 you have prepared to any USB port on the computer
- Safe and exit the BIOS settings. The computer should start the booting process again.
3.2. Start installing Windows 11
After you make changes to BIOS settings and exit BIOS as described above, the computer should boot from the USB drive. And the Windows 11 should begin.
Select language, time & currency and keyboard layout
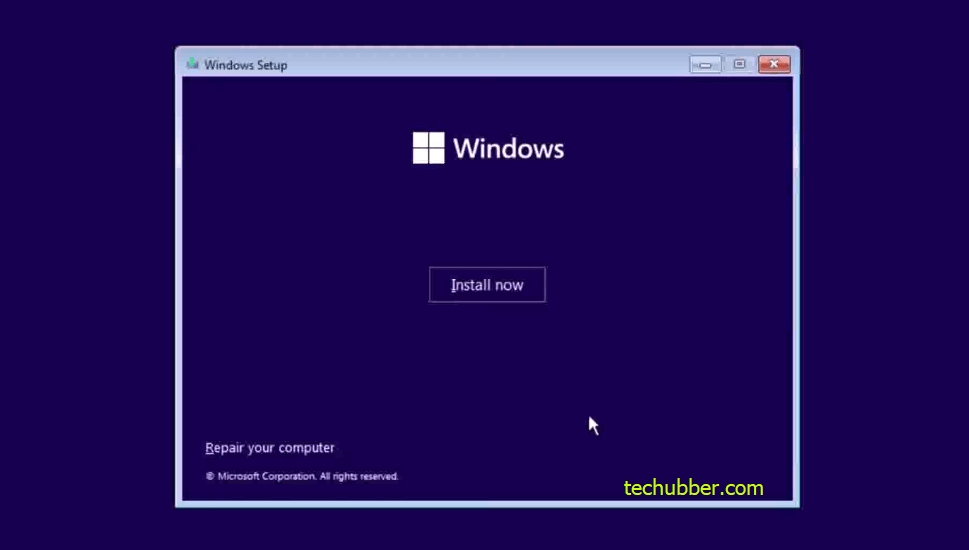
The Windows 11 setup should kick in with the Windows logo visible and dark blue background. You will get option to select language, time & currency and keyboard layout to install. Change as per your requirement, and click NEXT.
Click Install Now.
You should now see “Setup is starting”.

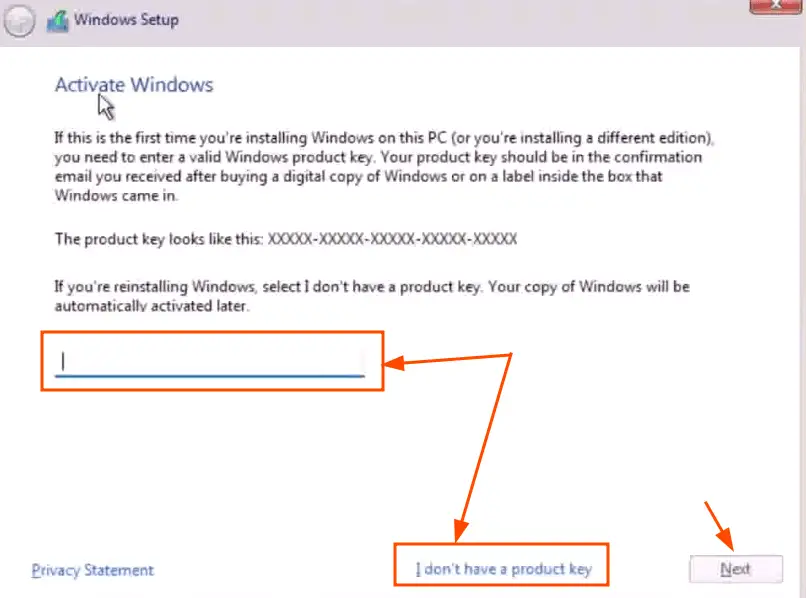
Next you will see “Activate Windows” – here you need to enter the Windows 11 licence key which you have purchased.
If you do not want to enter now or you do not have a licence or product key yet, you can click on “I don’t have a product key” and proceed. You can still enter the Windows 11 Key later and activate it after installation.
Note: If you are installing Windows 11 on an existing PC where Windows 11 was previously installed and activated, then you might not see this screen as Windows might already detect the digital licence for your Windows 11 PC.
Next, select the operating system you want to install.
Select the appropriate edition of Windows 11 for which you have purchased the licence key for.
Note: If you are re-installing Windows on a PC which was running Windows 11 before with valid licence, you might not get this option. As the Windows 11 type is already detected.
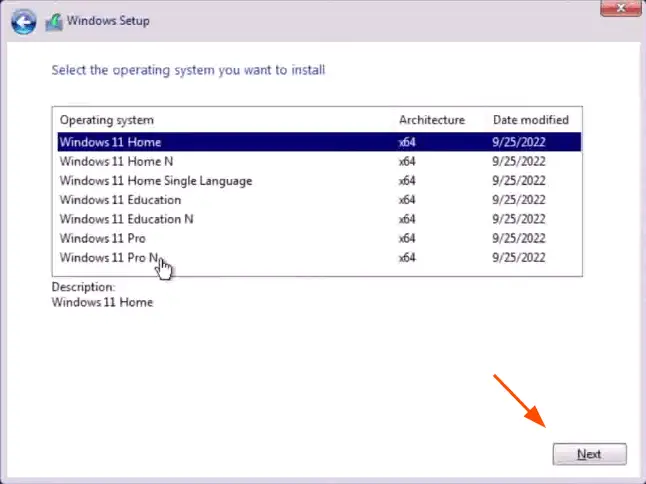
In the next page agree the Microsoft software licence terms, and click NEXT.
In the next page you will see “Which type of installation do you want?”
Here the options are:
- Upgrade – install Windows and keep files settings and applications
If you are upgrading existing Windows OS (10 or lower edition of Windows 11 to Windows 11) - Custom – install Windows only (advanced)
Select this if you are doing a clean install of Windows 11. You will also select this option if you are installing Windows 11 on a new PC.
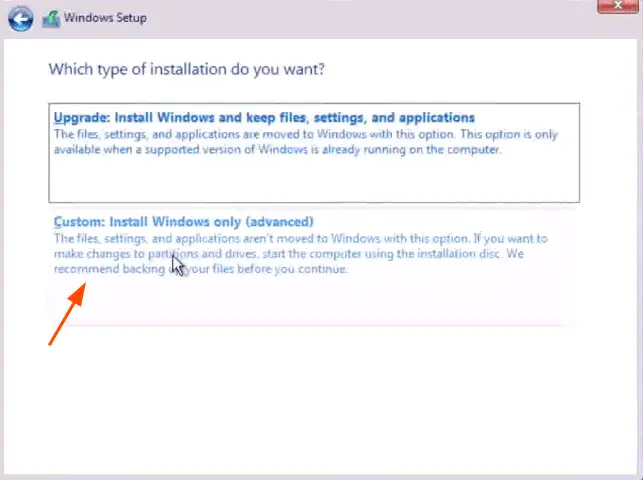
In the next screen you will see “Where do you want to install Windows?”
Here, Windows setup will detect the disks on the PC and its partitions. What you see here depends on your disk condition i.e. whether new (unformatted) or whether the disk was previously in use.
- If the disk is new (unformated), you may see only one labelled unallocated space. Select the disk, and click NEXT to proceed.
The disk will be formatted by the system and make ready for the installation. - If you have multiple disks on the PC, you should be able to see DISK 0, DISK 1 etc. Make sure you are selecting the right disk and right partition.
- If you are doing a clean install, which is the case in this example, you can delete all the existing partitions. Now you should see one partition only with “Unallocated Space”.
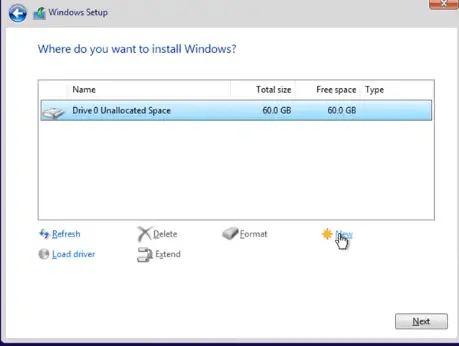
Click NEXT
Windows 11 installation will start from there. Windows
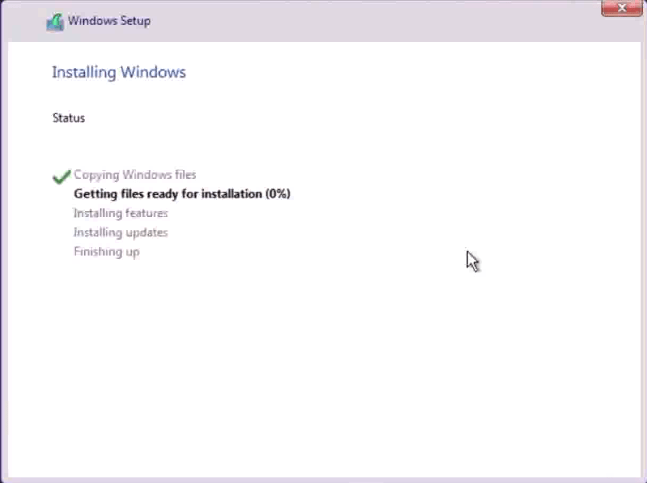
After the installation completes, Windows will restart.
NOTE: You may unplug the bootable USB from the PC. Otherwise, the PC will boot from the USB again since the first boot option is still USB. You can change in BIOS settings later.
After waiting for some time, you can start setting up your Windows 11 PC by following the instructions on the screen.
Next, you will get to select region, keyboard layout.
Next, it will ask you to connect to internet. You can plug in the internet cable or connect to Wi-Fi. Windows will look for updates for installation.
Next, it will ask you to name your device. Provide appropriate name for your device. Eg: HOMEPC.
Note: This will be the system device name.
Later, you are asked to add your Microsoft Account.
If you do not have a Microsoft Account, you can create one by clicking on the link provided if you want to. Windows 11 is better with Microsoft Account.
- If you want to add your Microsoft Account, enter the details and proceed.
What if you do not want to add Microsoft Account but use it with local account?
- If you DO NOT want to add a Microsoft Account, there is a way though there is not SKIP option provided here. This is useful if you want to use your Windows 11 PC with a local account. Just add a dummy email account and dummy password such as noone@noone.com. It will say – “Something went wrong”.
- Click Next.
- Now you will see an option to add a local account name at “Who’s going to use this device?”.
- Enter a name for the local account, and click next.
- Next, enter the password for the account.
- Next, enter some answers for the 3 security questions which can be used to reset password etc.
Next, review some privacy settings. Normally, unselect the “Send diagnostic data” (if you wish to). Or you can keep default settings.
Click Accept.
It will now check for updates again, and reboot.
After reboot, it will take you to Windows 11.
This completes the installation of Windows 11 using the bootable USB for Windows 11.
How to activate Windows 11 after installation?
If you did not enter Windows level licence key or product key during the installation process, you can proceed for Windows 11 Activation.
- Make sure your PC is connected to the internet.
- Click Start > Settings
- If your Windows 11 is not activated then you should see “Windows is not activated” message here. Click on Activate Now.
- It takes you to System > Activation page.
- Here you will see a message that no product key was found on your device.
- Click on change product key
- Enter the Windows 11 product key which you have purchased, and click next.
- Windows will now activate your Windows 11.