WiFi routers enable wireless devices to connect to the network. The WiFi range varies. If the existing WiFi range is not sufficient for your, then you might need to extend your WiFi range. We can extend Wi-Fi using wireless repeaters or wireless extenders. However, if you have a spare WiFi router lying at home, you might use it to extend the WiFi range without buying WiFi range extenders. Some WiFi routers have repeater function that enables you to easily extend WiFi range. In this post, we will see how to extend WiFi range using two WiFi routers.
In this post, we are using two Netgear WiFi routers.
(1) Netgear N300 Wireless Router : https://amzn.to/3wsh5eX
(2) Netgear JNR1010
The first one is setup as the base router and the second one as the repeater router as shown in the image below.

Table of Contents
How to extend WiFi range using two WiFi routers
Check out the following video we prepared regarding how to configure the Netgear routers to extend Wi-Fi range. As explained in the video, both these routers have the wireless extension feature. So, one of them is configured as the Base Wi-Fi router and the other is configured as the Repeater Wi-Fi.
Steps to configure two Netgear WiFi router to extend Wi-Fi range:
Step 1 : Note down the MAC Address of Router 1 and Router 2
Power on both the WiFi routers and connect each of the routers to separate computer.
If you do not have two computers, you may do the steps alternatively.
- Open and login to the configuration page of Router 1 (http://192.168.1.1 or htttp://192.168.0.1)
- Get the MAC address of the Router 1(you can directly go to status and get it).
- Note down the MAC address of both the routers.
Setup the first WiFi router – Base Router (Router 1)
- Plug in the cable from ISP to the WAN port of Router 1
- Power on the Router 1
- Connect a LAN cable to the computer and other end to the LAN port of Router 1
- Open a web browser and login to the admin page of Router 1
(The IP address could be http://192.168.1.1 or htttp://192.168.0.1. Check on the device for these details.). - Now, enable Wireless Repeating Function on the Router 1 from Advanced Setup
- Next, Enable Wireless Base Station – as we are going to use this router as the PRIMARY router (base).
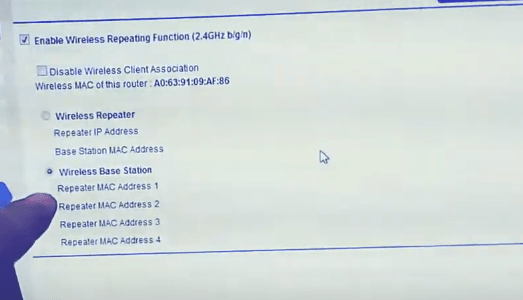
- Enter the MAC address of Router 2 in the “Repeater MAC address 1”
- Now, go to LAN setup menu, and enable DHCP server.
- Assign a range of IP address if desired say 192.168.1.2-99.
- Now, go to Wireless Setup menu, and configure the SSID / Wi-Fi Name (eg: Home-WiFiBase)
Also set the WiFi password. - Set Channel Number. Change Channel Number from Auto to any number.
Remember this channel number. We will need it when setting up Router 2. - Save the configuration.
After configuring the router 1 as the base station repeater, we now need to configure the router 2 as the repeater.
Setup the second WiFi router – Repeater Router (Router 2)
- Power on the Router 2
- Connect your computer to the LAN port of Router 2
- Open a web browser and login to the admin page of Router 2
(The IP address could be http://192.168.1.1 or htttp://192.168.0.1. Check on the device for these details.). - Enable Wireless Repeating Function from Advanced Setup
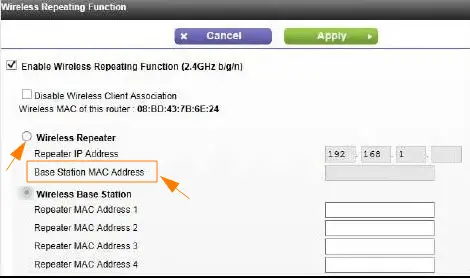
- Enable as Wireless Repeater on Router 2
(Note: earlier on Router 1 we enabled Wireless Base Station. On Router 2, we need to enable Wireless Repeater) - Enter the Repeater IP address for Router 2.
This is the IP that will be used to access Router 2. For example: if 192.168.0.1 is the default IP address of the routers, both cannot have the same IP. Therefore, set another IP for Router 2, say 192.168.1.100. - Next: Enter the MAC address of Router 1 in the “Base Station MAC address”.
- Now, go to Wireless Setup menu, and configure the SSID / Wi-Fi Name (Eg: Home-WiFiRepeater) and set the WiFi password as well.
(You can set a different SSID for router 2 so that you can distinguish which WiFi you are accessing and this will also help in troubleshooting in case of issues). - Set Channel Number which you set on Router 1.
Note: Change Channel Number from Auto to the same channel number you set on Router 1. - Save the configuration.
You can now unplug the Router 2 from the computer.
So the router 1 will be as it is – that is the ISP line will be inserted in the WAN port of router 1. Router 2 will not have any such input. You can place router 2 away from router 1 to some area where WiFi range from router 1 is reachable.
If the settings were done correctly, you should now be able to get Home-WiFiBase as well as Home-WiFiRepeater.
And you can connect wireless devices to both router 1 and router 2 depending on the range.
So, if your have spare WiFi Netgear routers lying around at home, you can use it to extend WiFi range.
Looking for WiFi Routers? Find deals on WiFi routers on Amazon!


How to extend WiFi range using WiFi range extenders?
If you do not want to go through the hassle of extending WiFi range using WiFi routers or if you do not have spare WiFi routers at home, you can also buy WiFi range extenders which are built specifically for WiFi range extension.
They are not very expensive and are easy to setup.
Check out some WiFi Range extenders on Amazon you might want to explore.


#WiFi range extenders
#extend WiFi range using WiFi routers
#WiFi Repeater


Leave a Comment (FB)