Integrating Facebook Comments Box into WordPress website can offer numerous advantages that enhance both user engagement and social media interaction. By allowing users to comment through their Facebook profiles, you invite a larger audience to participate in discussions. This ensures that comments are more authentic and can be easily traced back to individual profiles, thereby reducing the incidence of spam and anonymous trolling.
Another significant advantage is the seamless social media integration that the Facebook Comments Plugin provides. The Facebook Comments Plugin also simplifies the commenting process for users who are already logged into Facebook. This ease of use can encourage more frequent interaction since users do not need to create a separate account or log in to your site to leave a comment. This streamlined process can lead to higher engagement rates compared to the default WordPress commenting system.
In addition, using Facebook comments can enhance the credibility of your website. Comments tied to real identities tend to be more trustworthy, fostering a more genuine community around your content.
Table of Contents
Facebook Comment Box Code Generator
To integrate the Facebook Comment Box into your WordPress website, you must first generate the necessary code from the Facebook Developers site. Begin by navigating to the Facebook Comments Plugin page. Here, you can enter the required details in the Code Configurator, and Get Code for the Facebook Comment Box.
You can adjust settings like the width of your comments plugin or how many posts you want to show by default (num_posts). Click the Get Code button to generate your comments plugin code.
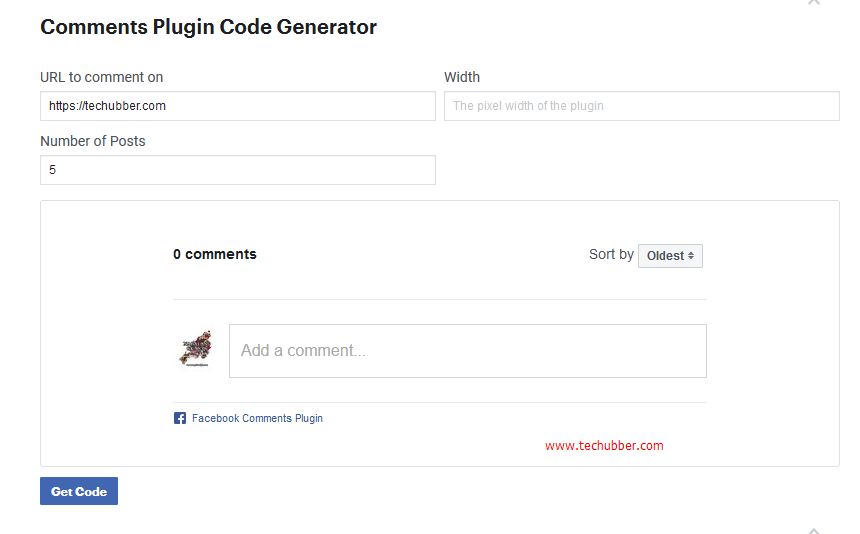
1. URL to comment on
Enter the URL of a website you want to use with the comments plugin. Just enter your website home page address for now. This need to be changed as per the page URL. Explained later.
2. Width
You may leave it blank, unless you have specific width requirements.
3. Number of Posts
Default value is 5. Update as per your requirements.
4. Sort by: Oldest or Newest
5. Click on Get Code
Once you click on the Get Code button, two different codes are displayed, as shown below.
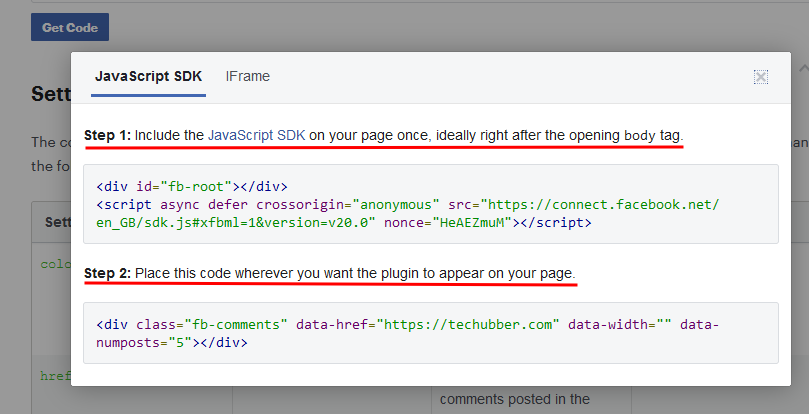
Part 1: (you can use as it is)
<div id="fb-root"></div>
<script async defer crossorigin="anonymous" src="https://connect.facebook.net/en_GB/sdk.js#xfbml=1&version=v20.0" nonce="HeAEZmuM"></script>
This is the JavaScript SDK for Facebook Comment Box which you need to insert on your page once, ideally right after the opening body tag. You can also include between the <head> and </head> tags.
If you are using WordPress website, you can put this code between the <head> and </head> tags in the header.php file for your WordPress theme.
Part 2:
<div class="fb-comments" data-href="https://techubber.com" data-width="" data-numposts="5"></div>This is the code for displaying the comment box. You need to out this code wherever you want the plugin to appear on your page.
Edit the code in Part 2:
If you use the code as it is, then Facebook Comment Box will appear just fine, and visitors can also comment. But the same comments will appear everywhere on your site / on other pages also. The reason is because, the data-href=”https://techubber.com” is the website home address. Ideally, the data-href= should contain the specific page URL. Therefore, edit the value in the data-href.
Example for WordPress website, you can use the following code for part 2. You can copy and use as it is.
<div class="fb-comments" data-href="<?php echo(get_permalink()) ?>" data-width="" data-numposts="5"></div>Where to place this code: This code should be available on every page where the comment box should appear. If you are using Content Management Systems (CMS) such as WordPress, you can put it in comments.php.
If you are using some other CMS , you need to find a file responsible for displaying comments.I
Inserting Facebook Comment Code into WordPress Theme Files
Adding a Facebook comment box to your WordPress website involves inserting the generated Facebook comment code into specific theme files. This process requires editing the theme’s code, typically within the header.php and single.php or comments.php file, to ensure the comment box displays correctly on individual posts or pages. Before proceeding, it is crucial to back up your theme files to prevent any loss of data in case of errors.
Put these codes in a WordPress Child Theme: It is advised to put these codes in a WordPress Child Theme files. Otherwise, when you update the WordPress version, the changes may be lost. If you have a WordPress child theme created only, copy the header.php and comments.php from the main theme to the child them, and then put the code above in the respective files.
To begin the code insertions, access your WordPress theme files via an FTP client or through the WordPress dashboard. If using the dashboard, navigate to Appearance > Theme Editor > Select the Child Theme.
Inserting the first code:
- In the editor, locate the
header.phpfile, and search for <head> and </head> tags. - Copy the first part of the Facebook Comment code
- Paste it just above the closing </head> tag, as shown below.
- After that, click on update file to save the changes.
<div id="fb-root"></div>
<script async defer crossorigin="anonymous" src="https://connect.facebook.net/en_GB/sdk.js#xfbml=1&version=v20.0" nonce="RUhKNHcK"></script>

</head>
Inserting the second code:
Next, from Appearance > Theme Editor > Select the Child Theme, locate the comments.php file, and search for the section where the comments are displayed, usually indicated by a comments_template function or a similar comment-related tag. Note: it will vary depending on the theme.
In the example code below, the second part of the code is inserted above the <div id=”comments”> in generate press child theme. <h3>Leave a Comment (FB) </h3> also has been included for title.
do_action( 'generate_before_comments' );
?>
<h3>Leave a Comment (FB) </h3>
<div class="fb-comments" data-href="<?php echo(get_permalink()) ?>" data-width="" data-numposts="5"></div>

<div id="comments">- After that, click on update file to save the changes.
After inserting the code in the respective files, and after saving the changes, clear your website’s cache, if applicable, to ensure the new comment box is visible.
Navigate to a post or page to verify that the Facebook comment box is displaying correctly. If you encounter any issues, double-check the placement of the code snippet and ensure no syntax errors exist in the theme files.
By following these steps and carefully editing your WordPress theme files, you can successfully add a Facebook comment box to your website, enhancing user interaction and engagement on your posts and pages.
Testing Facebook Comments
Once you have successfully integrated the Facebook comment box into your WordPress website, it’s crucial to ensure its functionality across different scenarios. Start by clearing your website’s cache. Cached versions of your site may not reflect recent changes, so this step helps you view the latest modifications. Most caching plugins, such as W3 Total Cache or WP Super Cache, offer straightforward options to clear the cache.
Login to Facebook in a web browser. In another tab, open your website and navigate to a post/page. Write a test comment and see if your are able to post a Facebook comment. You should be able to see the Facebook comments posted successfully. If not, review the steps above and check if you copied the codes correctly and whether you placed the code properly in the required files.
Additionally, check the responsiveness of the comment box on various devices, including desktops, tablets, and smartphones. Use tools like Google’s Mobile-Friendly Test to evaluate how well the comment box adapts to different screen sizes.
By following the steps discussed above, we can add a Facebook Comment Box in WordPress Website without creating a Facebook App.
More Facebook Comments Features
The Facebook code configurator only uses a subset of all possible settings for your comments plugin. You can also change the following settings displayed in the page.
Facebook Comments Moderation
The Facebook Comment box installed on the website using the code generated from Facebook is without Facebook Comments moderation feature till now. To use the Facebook Comment moderation tool, you either need to connect a Facebook account or a Facebook app to your comments plugin implementation.
We will cover Facebook Comments implementation with moderation in the next articles.
# Facebook Comments Moderation


Leave a Comment (FB)