HOW TO SETUP CUSTOM DOMAIN FOR BLOGGER BLOGSPOT SITE
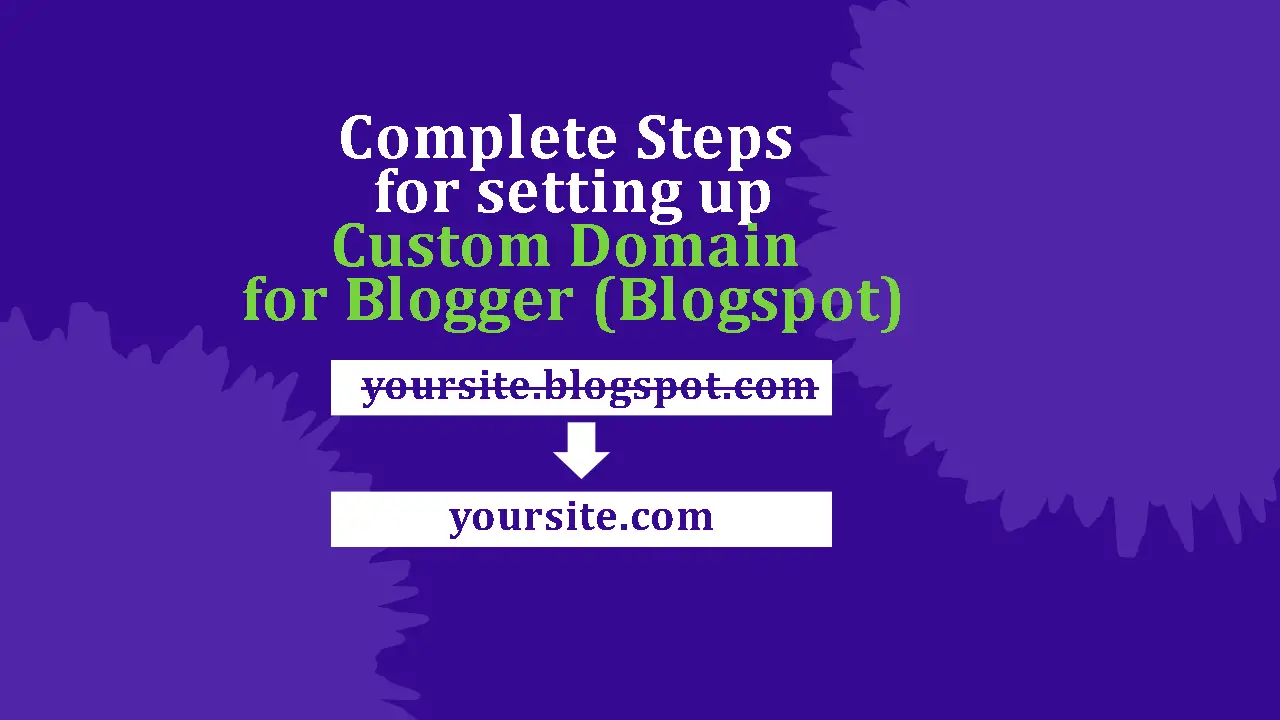
When you first setup a website on Blogger, the address of the website is something like “theblogname.blogspot.com“. As you can see, you have the “blogspot.com” in the domain name along with the name of your blog site. While this is also okay if you are using if for personal purposes, you might want to purchase a domain name and use the custom domain name if you are using Blogger for more professional purposes. In this post, we will discuss How to Setup Custom Domain for Blogger Blogspot Site.
If you are new to Blogger, read my previous posts on How to start a blog for free on Blogger.
Now, there are two basic requirements for running a website:
- Domain name: The unique name which identifies your website, and using which others will find your website.
- Web Hosting: A service that allows individuals and organizations to publish a website or web page on the internet. Basically, this is where you will store the website files.
If you want to use Blogger as it is, the above two things are taken care of as Blogger gives you an address (domain name), but a sub-domain under “blogspot.com” domain. This is okay if you are okay with it. But if you want to be more professional, you might want to go for custom domain name instead of the default address provided by Blogger such as “yourblogname.blogspot.com“.
Table of Contents
How To Setup Custom Domain for Blogger Website
In a nutshell, to Setup Custom Domain for Blogger Website, the basic steps are:
- Buy a domain name
- Configure Blogger to use custom domain name
- Configure CNAMEs and A records in the Domain’s DNS Management
Steps To Setup Custom Domain for Blogger Blogspot site
Watch this short video tutorial explaining how to Setup Custom Domain for Blogger Blogspot site
If you want to read instead, follow the paras below this video.
Step 1: Buy a domain name
If you want to use a custom domain for your Blogger website, then you need a domain name procured first. A domain name is the unique address of a website. We need to purchase domain name from a domain registrant such as hostinger, GoDaddy etc.
Basic steps involved for purchasing a domain name:
- Decide a name for your website.
- Visit a domain registrant website such as hostinger and check out the domain name availability.
- If the domain name you decided is not available, try another domain name.
- If the domain name is available for you, then you can go ahead and purchase it.
Step 2: Configure Blogger to use custom domain name
After you have purchased a domain name, you need to configure certain things on Blogger side and also on the domain service management side. Follow the steps below.
Step 2.1: Things to do on Blogger side
- Login to Blogger
- Go to Settings > Publishing > Click on Custom domain
- Enter the domain name and Click Save.

- When you click save, you may get the following error.
Blogs may not be hosted at naked domains (ex: yourdomain.com). Please add a top-level domain (www.yourdomain.com) or subdomain (blog.yourdomain.com).
- You need to add your domain with ‘www’. Eg: www.yourdomain.com. Click Save
- Next, you will get a message saying “We have not been able to verify your authority to this domain. On your domain registrar’s website, locate you domain name system (DNS) settings and enter the following two CNAME’s…”
- Leave the error message open or copy the details to Notepad for reference later. You can also click on the support page link in a new tab for reference.

- This error message contains important information for you to follow. It is basically instructing you to add some configuration details in the DNS of the domain you purchased. What details you need to add are also given in this message.
- Next, we need to head over to the DNS Management of the domain and do the necessary CNAME additions.
Step 2.2: Add CNAMEs and A records in the Domain’s DNS Management
We need to add some CNAMEs in the Domain’s DNS Management. For this, you need to be logged in to the management console of the domain service provider. You must have received some information after your domain purchase is completed.
- Go to your domain provider’s website / control panel and find the Domain Name System (DNS) management tool.
- Add the first CNAME displayed in BLOGGER error message in the domain DNS
- In the Domain’s DNS Management, find a CNAME with name = www, and click on edit.
- If there is no CNAME with ‘www’, then add new CNAME for www.
- Before: Host = www | Points to = @
- Replace the default value (which is usually ‘@’) and enter ghs.google.com
- After: Host=www | Points to = ghs.google.com

- Add the second CNAME displayed in BLOGGER error message in the domain DNS
- Find a button to add a new record
- Select CNAME as the type of record to add.
- Get the following (Name: xxxxx, Destination: gv-hf3xxxxxxx.dv.googlehosted.com) details from the Blogger custom domain settings page and enter here
- Host=xxxxx
- Points to = gv-hf3xxxxxxx.dv.googlehosted.com
- Click save
- Add A record in the Domain’s DNS to Redirect URL without www to your blog’s URL with www
- In the Domain’s DNS Management page, find a button to add a new record
- Select A record as the type of record to add.
- Host = @, Points To= 216.239.32.21
- Save itz
- Repeat the same process for all the IPs addresses listed below
- 216.239.34.21
- 216.239.36.21
- 216.239.38.21
Step 2.3: Go back to Blogger and save the custom domain settings.
After you are done with the necessary CNAME and A record additions in the DNS management, you can go back to the Blogger setting page and do the following.
Save the Blogger Custom Domain settings
- Go to Settings > Publishing > Click on Custom domain > Click save.
If everything is fine, you should be able to save it without the previous error displayed.
Turn on Redirect domain
- If you want, you can also enable redirect domain to redirect URL without ‘www’ such as mydomain.com to www.mydomain.com.

NOTE: DNS settings can take up to 48 hours to change. Once the custom domain name change is applied, you can access your Blogger (Blogspot) site with the new domain name.
# How to configure Blogger with custom domain name
# How to setup your own domain for Blogger
Leave a Comment (FB)