There is a lot of buzz on the internet that Ezoic is better than Google Adsense and that Ezoic can increase your monetization revenue. This post is not about whether Ezoic is better than Google Adsense or not. Ezoic integration is no doubt more complicated than Google Adsense. You need to start the integration process even before you are confirmed approved. So, in case your website is not approved, then you need to undo all the integration you have done for your website. For whatever reason, if you need to remove your website from Ezoic, following the steps below on How to remove website from Ezoic.
Basic steps to remove website from Ezoic includes:
Step-1: Uninstall the Ezoic WordPress Plugin (if using Ezoic Plugin in WordPress CMS)
Step-2: Remove website integration with Ezoic
Step-3: Remove website from Ezoic dashboard
Let’s go through the steps in more detail.
Table of Contents
Step-1: Uninstall the Ezoic WordPress Plugin (if using Ezoic Plugin in WordPress CMS)
As you might already know, publishers can also integrate WordPress website with Ezoic using the Ezoic WordPress plugin. It is slower than cloud integration, so it is not recommended however it is advisable to install the Ezoic WordPress plugin to take advantage of the plugin’s CDN management settings, and optimizations for Leap etc.
If you have decided to remove your website from Ezoic, you should install and remove the Ezoic WordPress plugin and proceed with the other steps below.
Uninstalling the Ezoic WordPress Plugin is same as uninstalling any other WordPress plugin which you can do it from the Plugins menu after logging in to your WordPress website.
Step-2: Remove website integration with Ezoic
- Login to Ezoic
- If you have multiple website integrated with Ezoic, make sure you select the website which you want to remove from Ezoic
- After that Click on Settings
- Click on the Connection tab from the left sidebar
- Here it will show you how your website is integrated.
When you first added your website to Ezoic, you must have integrated your website with Ezoic using one of the following Ezoic integration methods:
- Integration with Ezoic nameservers
- Integration with Cloudflare
- Integration with Ezoic WordPress plugin
Remove Ezoic integration – if you have integrated with Nameservers
If you integrated your website with Ezoic nameservers, you need to go to your Domain manager control panel, and remove the Ezoic nameservers added, and replace with your domain’s nameservers.
For example: You must have changed the nameservers of your domain to Ezoic’s nameservers such as:beagle.ezoicns.com, dugong.ezoicns.com,insect.ezoicns.com etc. You need to change these back to the nameservers provided by your domain registrant.
Now, the changes in your nameservers may take up to 24 hours to propagate. So it may not reflect in your Ezoic account immediately. In that case you need to wait for some time to confirm if the nameserver integration is removed.
Once removed, the integration status on Ezoic will be updated. And when you login to Ezoic, you should be able to see that your website is no longer integrated with Ezoic. If you see “Integrate Your Site With Ezoic – INCOMPLETE“, it indicates that your website is no longer integrated with Ezoic.
Remove Ezoic integration – if you have integrated with Cloudflare:
This may be required to be done even if you integrated with nameservers. Because Ezoic offers free CDN from Clourflare.
- Login to Ezoic
- Go to Settings > Connection> Cloudflare tab > Disconnect Cloudflare
- Delete website from Cloudflare account
- You can Re-add web site to Cloudflare account if you use Cloudflare.
- Under Ezoic Settings > DNS Records > Select the DNS entry where it shows “Cloudflare Proxy” Yes > Click Edit > Change to NO.
Next, you need to remove your website from Ezoic.
Step-3: Remove website from Ezoic dashboard
- Login to your Ezoic Account
- Go to Settings > Manage Sites > Remove Site.
- Click on the Remove Site button to completely remove your website from Ezoic.

You can also remove website from Ezoic account by selecting the website from the top. A sidebar open on the right.
Select the particular website and click on remove site.

A new window will appear and you need to confirm the removal.
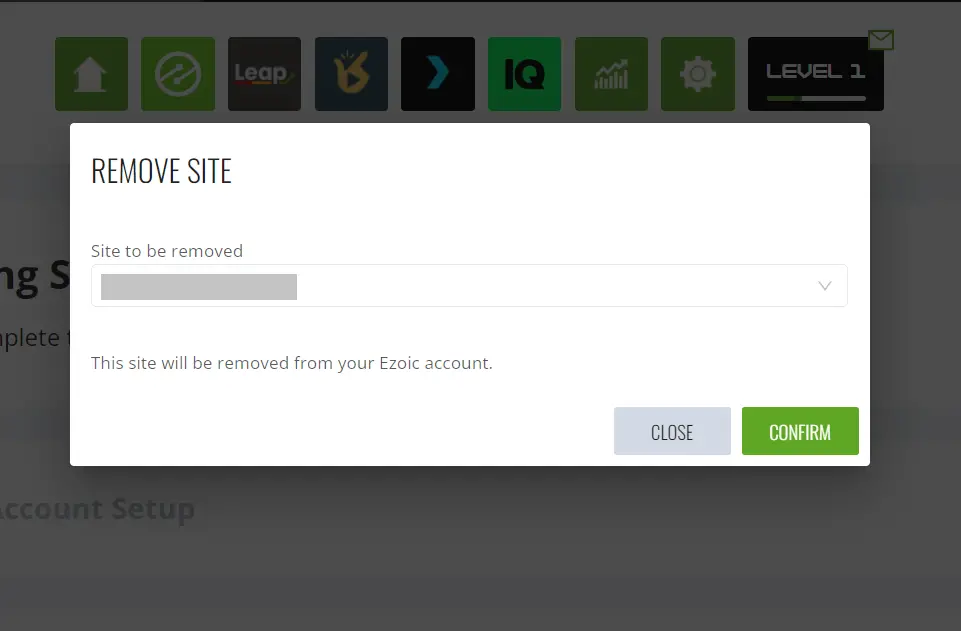
You should now see a message like “Site has been removed from account”.
If you face issues with the removal of website from Ezoic, you can raise a support ticket on https://support.ezoic.com.
But support ticket is not available for Level 1 users, so if you are a Level 1 user, you may also raise a query on https://community.ezoic.com.
Additional: Remove Third-Party Integration from Google Adsense
You should do this if you want to completely remove Ezoic from all your websites, in that case, you should have removed websites from Ezoic following the steps described above. But suppose, you have a website which is Ezoic approved but some other websites which is not, and you continue to run Google Adsense on them, then you may not do the following.
To remove Ezoic as the Account Manager from Google Adsense, follow the steps below:
- Go to your AdSense account and navigate to the “Account” section.
- Look for the “Third Parties” option.
- In the list of third-party integrations, locate “Ezoic, Inc.“
- Click on the option to “Remove Manager from Account.”
By following these steps, you will successfully remove the Ezoic integration from your AdSense account.
# ezoic website monetization
# ezoic integration
# remove website from ezoic
Leave a Comment (FB)