Visual Studio 2010, developed by Microsoft, is a powerful Integrated Development Environment (IDE) that caters to a wide range of development needs. It includes numerous components such as libraries, extensions, and development tools that enhance its functionality. However, these myriad components also make the process of completely uninstalling Visual Studio 2010 quite challenging. When users attempt to remove this IDE, they often find that it leaves behind residual files and programs. These remnants not only clutter the system but also consume valuable storage space and can potentially cause conflicts with other software. In this post, we will see How to Completely Uninstall Visual Studio 2010.
Table of Contents
Challenges to Completely Uninstall Visual Studio 2010
The Visual Studio 2010 uninstall process does not always remove all the files associated with Visual Studio 2010. For instance, certain libraries and extensions might remain on the system even after the uninstallation process is complete. These leftover files can cause significant issues, such as conflicting with other software installations or updates, leading to system instability. Additionally, development tools that were installed alongside Visual Studio 2010 may also linger, further complicating the uninstallation process.
There are several reasons why users might want to uninstall Visual Studio 2010. Commonly, users may be looking to upgrade to a newer version of Visual Studio or switch to a different IDE that better meets their current development needs. Upgrading to a newer version of Visual Studio often requires a clean slate to ensure compatibility and optimal performance. Similarly, switching to a different IDE might necessitate the complete removal of Visual Studio 2010 to avoid any potential conflicts or redundant files.
Given these challenges, it is crucial to ensure a thorough uninstallation of Visual Studio 2010. A complete removal not only frees up valuable system resources but also helps maintain a stable and efficient operating environment. Proper uninstallation practices ensure that no residual files or programs are left behind, thereby preventing any future complications. Understanding the various components that Visual Studio installs and the reasons for a complete uninstallation can guide users in effectively managing their software environments.
1) Steps to Uninstall Visual Studio 2010 from Control panel (the normal way)
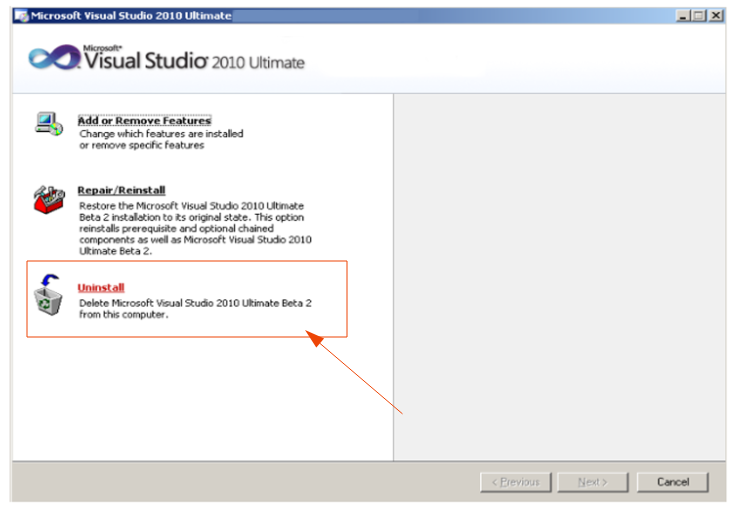
To completely uninstall Visual Studio 2010, begin by navigating to the Control Panel > ‘Programs and Features’.
- Type Visual Studio 2010 in the search bar – you will see all Visual Studio 2010 related programs installed.
- Scroll through the list to find the main program with the name like ‘Microsoft Visual Studio 2010‘. Once located, select it and click the ‘Change/Remove‘ button at the top of the list.
- Microsoft Visual Studio 2010 Setup Wizard will appear with option for your to repair or uninstall Visual Studio 2010 and Visual Studio components.
- Click on the Next button to continue with the next step in uninstalling Visual Studio 2010 process.
- Choose the Uninstall option for a complete uninstall of Visual Studio 2010.
After the Visual Studio 2010 program is uninstalled, you may still find some Microsoft Visual Studio related files still lingering in the list of programs. You may have to uninstall them separately.
- Return to the ‘Programs and Features’ list and look for additional programs to uninstall, such as ‘Microsoft .NET Framework’, ‘Microsoft Visual C++ Redistributables’, and any other related components. Uninstall these as well to ensure a thorough cleanup.
- Next, check the ‘Program Files’ directory for any leftover files.
Typically, you can find this directory by navigating to C:Program Files (or C:Program Files (x86) on a 64-bit system). Look for any folders related to Visual Studio 2010 and delete them manually. - Additionally, inspect the ‘AppData’ directory, which might contain user-specific settings and data files left behind. You can access this directory by typing %appdata% in the Windows search bar and browsing through the resulting folder.
Finally, to ensure all changes take effect, it is recommended to restart your computer.
This step helps in clearing any remaining temporary files and finalizing the uninstallation process. By following these steps, you can completely uninstall Visual Studio 2010 from your system.
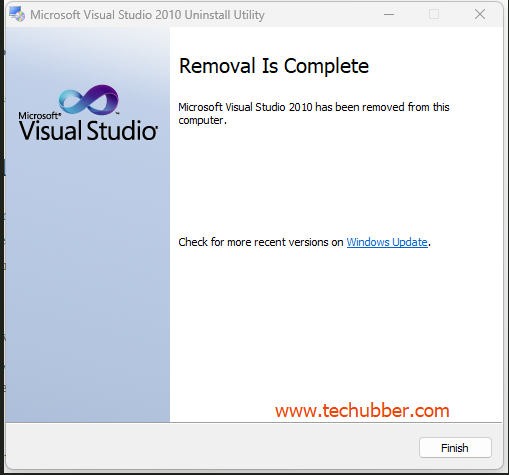
2) Using the Visual Studio 2010 Uninstall Utility
The Visual Studio 2010 installs lots of components which will not be removed if you uninstall Visual Studio 2010 normally from control panel. Therefore, Microsoft provides a utility to clean uninstall these files completely. You can download this utility from here (Visual Studio 2010 Uninstall Utility Download Link) | Or https://aka.ms/vs2010uninstall
This tool is designed to go beyond the standard uninstallation process, which often leaves behind residual files, settings, and registry entries. The Visual Studio 2010 Uninstaller Utility provides a more efficient and complete solution for users looking to completely uninstall Visual Studio 2010.
1. Download the Visual Studio 2010 Uninstall Utility
2. Run the Utility as an administrator
3. Configure Options: The utility may present options for the uninstallation process. It is advisable to select all components to ensure a comprehensive removal.
4. Start the Uninstallation: Click the ‘Uninstall’ button to initiate the process.
The utility will automatically handle the removal of all associated files, configurations, and registry entries.
5. Completion: After the uninstallation process is complete, the utility will prompt you to restart your system. This step is crucial to finalize the removal process and ensure all changes take effect.
One of the key advantages of using the Visual Studio 2010 Uninstaller Utility is its ability to automate the removal process. This not only saves time but also reduces the risk of errors that can occur during manual uninstallation. By leveraging this utility, users can ensure a cleaner system, free from leftover files and settings that could potentially cause conflicts or issues with future installations.
3) Uninstall Visual Studio 2010 Using Command Prompt
For advanced users, uninstalling Visual Studio 2010 via the Command Prompt can be a powerful and efficient method.
NOTE: Before executing this command, it is advisable to back up any important data related to your Visual Studio projects. This precautionary step ensures that no critical information is lost during the uninstallation process.
Steps to Uninstall Visual Studio 2010 Using Command Prompt
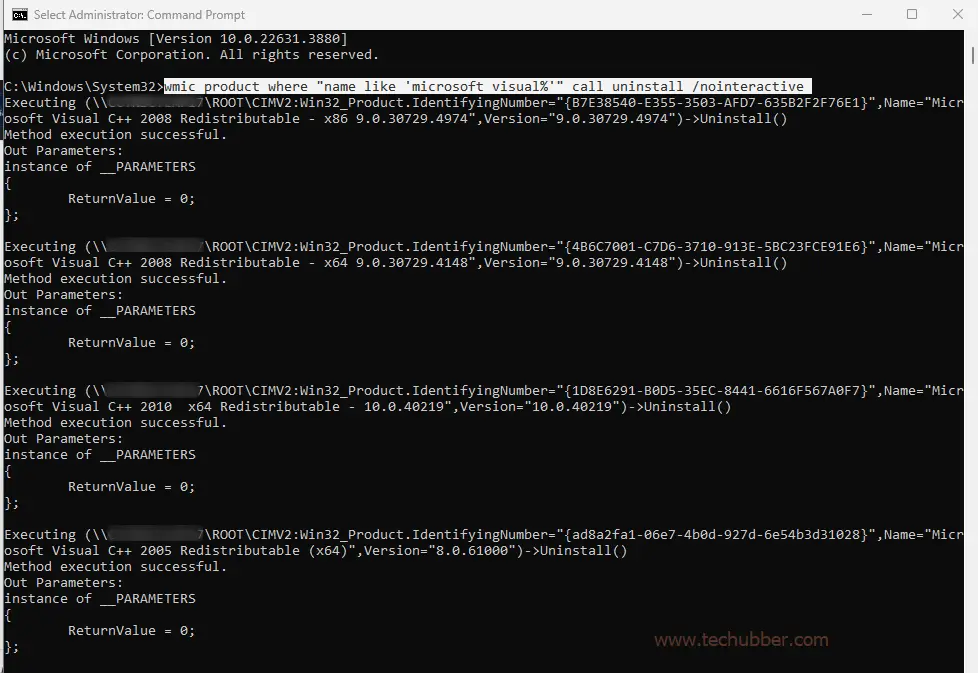
To do this, type “cmd” in the Start menu search bar, right-click on Command Prompt, and select “Run as administrator.“
Once the Command Prompt is open with administrative privileges, the ‘wmic’ command can be utilized to uninstall programs. WMIC, or Windows Management Instrumentation Command-line, is a robust tool that allows users to perform various administrative tasks, including software uninstallation, directly from the command line.
To begin the uninstallation process, use the following command syntax:
wmic product where "name like 'Microsoft Visual Studio 2010%'" call uninstall /nointeractive
This command requires precise understanding of each part:
- wmic product: This invokes the WMIC utility and specifies that you are working with installed products.
- where “name like ‘Microsoft Visual Studio 2010%'”: This clause filters the products to those whose names begin with “Microsoft Visual Studio 2010.” The percentage sign (%) acts as a wildcard, ensuring all versions and editions of Visual Studio 2010 are included.
- call uninstall: This instructs WMIC to call the uninstall method on the filtered products.
- nointeractive: No prompts.
After running the command, it may take a few moments for the uninstallation to complete.
To verify that Visual Studio 2010 has been entirely removed, you can check the list of installed programs.
Open the Control Panel, navigate to “Programs and Features,” and ensure that Visual Studio 2010 is no longer listed.
Additionally, you may want to search your computer for any remaining files or directories related to Visual Studio and delete them manually.
By following the above steps, hopefully, you will be able to completely Uninstall Visual Studio 2010 from your computer.
Let us know how you Completely Uninstalled Visual Studio 2010. We would like to hear from you too.


Leave a Comment (FB)