Contact forms are must have for any website if you want interaction from your visitors or for enquiry on your product, services or for assistance. It is very easy to create a free contact form on WordPress website using Contact Form 7 WordPress plugin. In this post, we will see How to add Google reCaptcha with Contact Form 7.
If you are using Contact form 7 plugin on your WordPress website then you should definitely configure Google reCaptcha to prevent spam messages from your contact form.
Before you add Google reCaptcha to Contact Form, it is assumed that:
- You have a WordPress website hosted on web host and with a domain name
- You have email address created for your website
- You have Contact Form 7 and WP Mail SMTP plugins installed and configured successfully
- You have successfully tested the contact form.
If you don’t know how to create a free contact form for your WordPress website, then you can check out this previous article where we discuss about – creating email address on your web hosting, how to configure WP Mail SMTP plugin to send emails from your website, and how to create a free contact form for WordPress website.
Table of Contents
Why add Google reCaptcha with Contact Form 7 ?
Adding Google reCAPTCHA to Contact Form 7 helps protect your forms from spam and automated bot submissions. It ensures that only real users can send messages through your contact form, keeping your inbox clean and your website secure. With Contact Form 7 reCAPTCHA integration module, you can block abusive form submissions by spam bots.
Step by Step Guide to add Google reCaptcha with Contact Form 7
If you have not yet installed Contact Form 7 to your WordPress website, refer this article for step by step guide. Assuming we have installed and tested the contact form, let’s proceed to add Google reCaptcha with Contact Form 7.
Step 1: Get Site Key and Secret Code from Google reCaptcha
To integrate Google reCaptcha with Contact Form, we need Site Key and Secret Code for Google reCaptcha. reCAPTCHA is Google’s service so you need a Google account to use it. If you already have a Google Account, do the following:
- Go to the Google reCaptcha admin page – Google reCAPTCHA.
- Enter the required details
- Label (for your reference),
- reCAPTCHA type: select v3
- Domains: yourwebsite.com
- Google Cloud Platform > Project Name > Give a name for your project (Eg. Website Name _reCaptcha)
- Agree the terms and condition
- Click SUBMIT
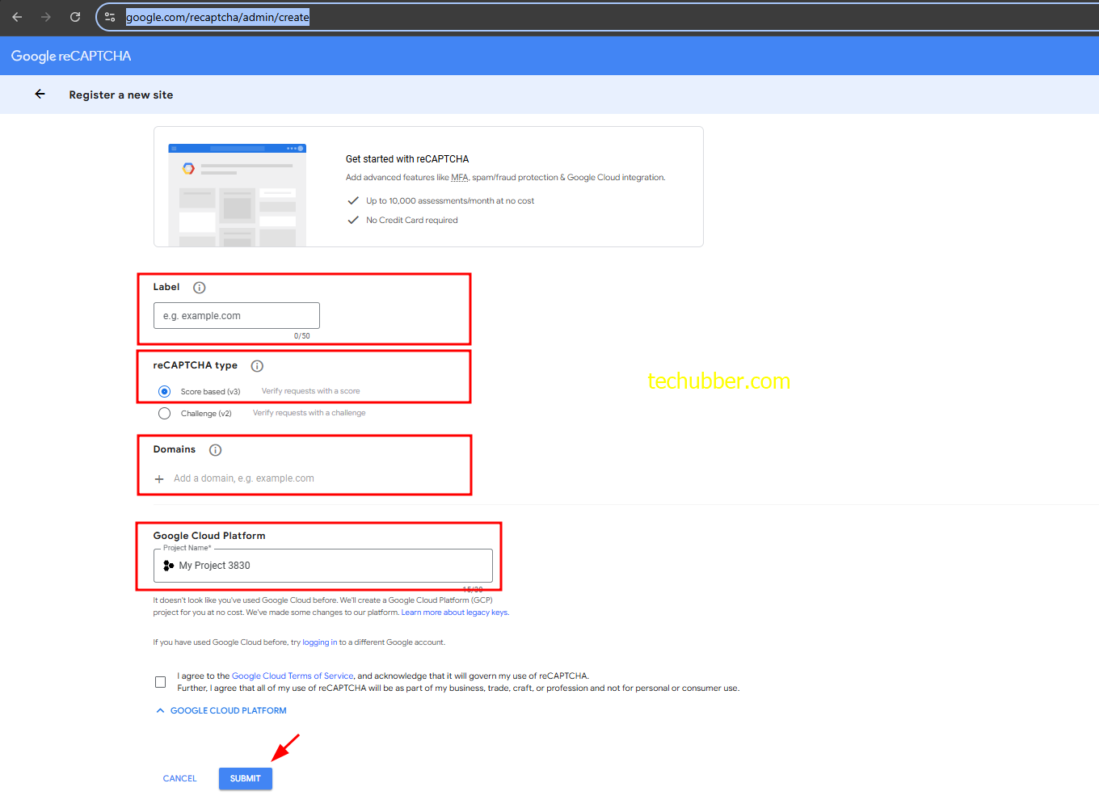
- You will come to a page where Google reCaptcha Site Key and Secret Code is displayed. We’ll use it later, so keep this page open.
Step 2: Configure Contact Form 7 with the Site Key and Secret Code from Google reCaptcha
- Go to the WordPress admin, then click on CONTACT > INTEGRATION menu in the WordPress sidebar.
- Find reCAPTCHA and Click on ‘Setup Integration‘
- Copy the SITE KEY and SECRET CODE from the Google reCaptcha page and paste it in its respective places here.
- Click SAVE CHANGES.

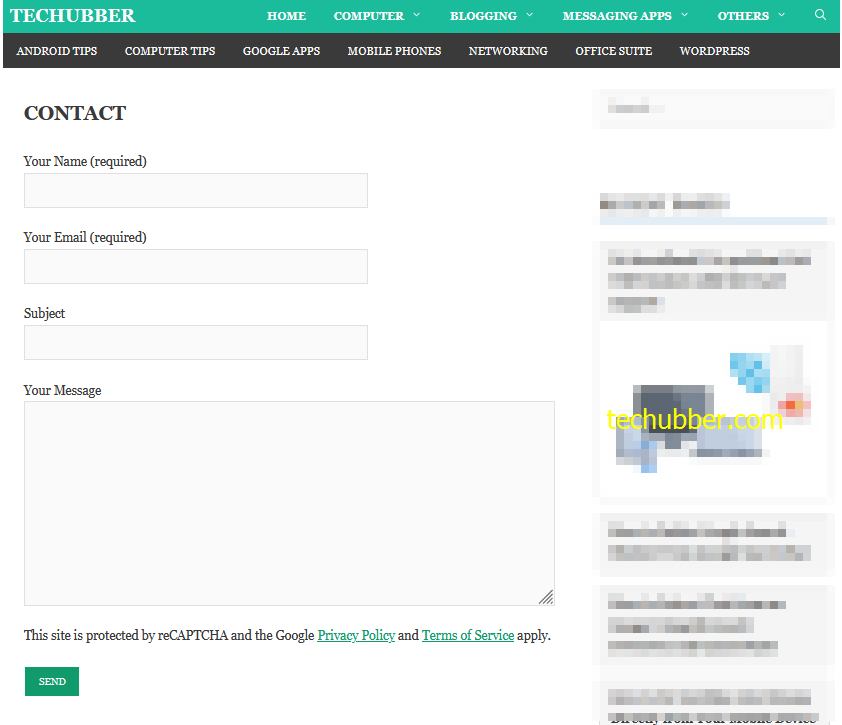
After you add Google reCaptcha to the contact form, you will be able to see a message like this below the contact form:
This site is protected by reCAPTCHA and the Google Privacy Policy and Terms of Service apply.
That’s all. We have finished adding Contact Form and integrated Google reCaptcha with the Contact Form on WordPress website.
NOTE:
- Earlier, we used to add Google reCaptcha in the Contact Form 7 using the tag
[recaptcha]in the Contact Form 7 Form design. However, reCAPTCHA v3 doesn’t need a CAPTCHA widget (the “I’m not a robot” checkbox used in reCAPTCHA v2) to work. So[recaptcha]form-tags are no longer necessary. - For Contact Form 7 to work correctly, your website should be able to send emails. You can use WP Mail SMTP plugin. WP Mail SMTP help us to send emails via SMTP instead of the PHP mail() function.
# Add Contact Form in WordPress website # Integrate Google reCaptcha in Contact Form 7 #Add Contact Form 7 in WordPress website #Contact Form WordPress Plugin


Leave a Comment (FB)